Sunday, December 1, 2024

Maple Pecan Pie (Without Corn Syrup)

I recently came across this Pecan Pie recipe that uses pure maple syrup instead of corn syrup and really wanted to try it. I didn't end up making it for Thanksgiving so I made it today to take to my parents' house tonight. I used my go-to pie crust recipe, but I only made half a recipe since I only needed a bottom crust. I didn't measure the ice water like I usually do and used too much, so my dough was a little wet. I also forgot to poke holes in it.

I happened to have Crown Maple Syrup, which Costco sells around the holidays, so I used that for my pecan pie. I did not use cinnamon or nutmeg in my pie and I don't think the recipe needs them. Mixing the pie filling is super easy and only requires a whisk, but be careful not to over mix the filling, which can cause it to puff up and crack while baking.

I always find it hard to tell when pecan pie is finished. If you remove it from the oven too soon, it will be soupy in the middle, and if you bake it too long it will be too hard. Remove it from the oven when you insert a toothpick in the center and just a little bit of gooey filling is on the toothpick. I tried to tell if it was done just by how jiggly the pie filling was. I'm pretty sure mine took longer to bake than 40 minutes, but my son turned the oven timer off at some point while my pie was baking, so I have no idea how long it was actually in the oven, but it was definitely longer than the recipe calls for.

I read a review on this recipe that said to avoid a soggy crust, you can blind bake the crust (with pie weights) at 400° for 10-15 minutes, then pour in the mixed ingredients and finish baking the pie. You may need to bake 10 minutes longer than the recipe says.

This pie was pretty delicious! I served it with homemade whipped cream to my husband (it's his favorite kind of pie and he loved this recipe!), mom and siblings and they all enjoyed it too. If you're looking for a good pecan pie recipe and don't have or don't want to use corn syrup, give this one a try!


Maple Pecan Pie Recipe (Without Corn Syrup)

Recipe from Cucina by Elena


If you are looking for the BEST pecan pie without corn syrup, you’ve landed on the right recipe! This delicious pie has a beautifully rich maple syrup flavor and warm spices that enhance the pecan flavor. The buttery, flaky pie crust nestles it together, making it irresistible.  


Homemade 9” pie crust

2 cups (8 ounces) pecan halves

3 large eggs, at room temperature, lightly beaten

4 tablespoons butter, melted

2/3 cup dark brown sugar, packed

1/3 cup granulated sugar

1 tablespoon all-purpose flour

¾ cup real maple syrup

2 teaspoons pure vanilla extract

½ teaspoon salt

1 teaspoon ground cinnamon (optional)

¼ teaspoon ground nutmeg (optional)


Preheat the oven to 400°.


Prepare the pecans:

Spread the pecan halves evenly inside the unbaked pie crust. Place the crust in the fridge to chill while you prepare the filling.


Make the filling:

In a large bowl, whisk the eggs until foamy.


Whisk in the melted butter until smooth.


Add the dark brown sugar, granulated sugar, and flour, whisking just until everything is well combined, but don’t over mix.


Stir in the maple syrup, vanilla extract, salt, cinnamon, and nutmeg (if using). Whisk just until smooth and fully combined, but don’t over mix.


Assemble the pie:

Take the chilled pie crust with pecans out from the fridge.


Carefully pour the filling mixture over the pecans, ensuring they are evenly coated.


Bake the pie:

Place the pie in the preheated oven and bake for 10 minutes at 400°.


After 10 minutes, reduce the oven temperature to 350° and continue baking for 30-40 minutes, or until the filling is set and only slightly jiggles in the center.


Check halfway through and cover the pie with foil if it’s browning too quickly.


Cool and serve:

Once baked, remove the pie from the oven and let it cool on a wire rack for at least 2 hours before slicing. The filling will firm up as it cools.


If desired, sprinkle a little flaky sea salt on top before serving for a balanced sweet and salty flavor. You can also serve with a scoop of vanilla ice cream or freshly whipped cream. 


NOTES:

Use real maple syrup: Pure maple syrup (not imitation) gives the pie a rich, natural sweetness. It’s the star of the show, so go for quality!


Chill the crust: After placing the pecans in the pie crust, chill the crust in the fridge while preparing the filling. This helps the butter firm up, creating a flakier, crisper crust when baked.


Don’t over mix the filling: When whisking the eggs and other ingredients, mix until just combined to avoid a tough filling texture. Over mixing can cause the filling to puff up too much and crack.


Saturday, November 30, 2024

Apple Pie

I was asked to make an apple pie for Thanksgiving this year but I hadn't made one in at least 10 years. I used a Buttery Flaky Pie Crust recipe for the crust. My grandma Filomena always made delicious pies and this apple pie recipe of hers is no exception - it's simple, classic and always a hit!

Since I don't make pie often, I'm posting this recipe so I don't forget what I did the next time I go to make one. I used a mixture of apples - 1 each of Fuji, Gala, Honeycrisp, Pink Lady and Granny Smith. Since my pie dish is 10.5" and larger than the standard 9" dish, I made about 1.5 recipes of the pie filling below, which worked perfectly. I used 1 cup sugar, 1/3 cup flour, 1 teaspoon cinnamon, 9 cups of sliced apples, 2 tablespoons of butter and juice from 1/2 lemon. I always bake my pies on a baking sheet just in case anything spills out of them (some butter overflowed on the sides). My pie dish is ceramic, which heats slower than glass, so I added 5 minutes on to the baking time - the apples were crispy and perfect. Everyone loved the pie!


Apple Pie


For 9” pie plate.


¾ cup sugar

¼ cup flour

¾ teaspoon cinnamon

6 cups tart apples, peeled and thinly sliced

2 tablespoons butter

Lemon juice


Heat oven to 425˚.


Stir together sugar, flour, and cinnamon. Mix with apples. Turn into pastry-lined pie pan; dot with butter; sprinkle with lemon juice. Cover with top crust which has slits cut in it. Seal crust around the edges. Cover edge of pie with 2 or 3 inch strip of aluminum foil to prevent excessive browning of edges. REMOVE FOIL LAST 15 MINUTES OF BAKING.


Bake for 30-45 minutes.


Homemade Buttery Flaky Pie Crust

This Buttery Flaky Pie Crust Recipe is super easy to make and delicious! So far I've used it for chicken pot pie, apple pie and pecan pie. This recipe makes is enough for a double crust but it can easily be cut in half to make just one crust (that's what I do when I make a pecan pie). You can also make the dough and refrigerate it in discs for up to 5 days before rolling it out, which helps around the holidays so you don't have to do everything in one day.

Making a pie always intimidates me because I'm not good at making the crust look nice, but this recipe is so simple and always tastes delicious - that's why it's my go-to pie crust recipe!

This link also has some more great tips!


Homemade Buttery Flaky Pie Crust

Recipe courtesy Sally’s Baking Addiction


This recipe is enough for a double crust pie. If you only need 1 crust for your pie, cut this recipe in half OR freeze the other half per the make ahead tip instruction below.


2½ cups all-purpose flour (spoon & leveled) plus more as needed for shaping and rolling

1 teaspoon salt

6 Tablespoons unsalted butter, chilled and cubed

2/3 cup vegetable shortening, chilled

½ cup ice water


For best results, chill all ingredients before using. Mix the flour and salt together in a large bowl and chill them.


Add the chilled and cubed butter and shortening to the chilled flour and salt mixture.


Using a pastry cutter or two forks, cut the butter and shortening into the mixture until it resembles coarse meal (pea-sized bits with a few larger bits of fat is OK). A pastry cutter makes this step very easy and quick.


Measure ½ cup of water in a cup. Add ice. Stir it around. From that, measure ½ cup water since the ice has melted a bit. Drizzle the cold water in, 1 Tablespoon at a time, and stir with a rubber spatula or wooden spoon after every Tablespoon added. Stop adding water when the dough begins to form large clumps. I always use about ½ cup of water and a little more in dry winter months (up to ¾ cup). Do not add any more water than you need.


Transfer the pie dough to a floured work surface. The dough should come together easily and should not feel overly sticky. Using floured hands, fold the dough into itself until the flour is fully incorporated into the fats. Form it into a ball. Cut dough in half. Flatten each half into 1-inch thick discs using your hands.


Wrap each tightly in plastic wrap. Refrigerate for at least 2 hours and up to 5 days.


When rolling out the chilled pie dough discs to use in your pie, always use gentle force with your rolling pin. Start from the center of the disc and work your way out in all directions, turning the dough with your hands as you go. Visible specks of butter and fat in the dough are perfectly normal and expected!


Proceed with the pie per your recipe’s instructions.


NoteS:

Make Ahead & Freezing Instructions: Prepare the pie dough through step 4 and freeze the discs for up to 3 months. Thaw overnight in the refrigerator before using in your pie recipe.

Shortening:  I use between 2/3 and 3/4 cup of cold shortening in this dough. Lately, I find 2/3 cup (which is 10 Tbsp + 2 teaspoons) works best.

Salt: Use regular table salt. If using kosher salt, use 1¼ teaspoons.

Sunday, November 3, 2024

Easy Homemade Biscuits

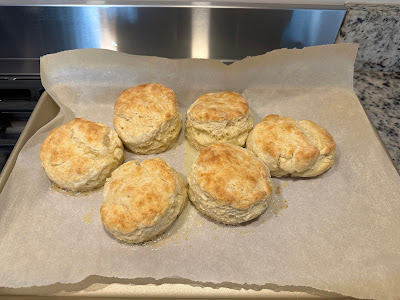
Biscuits are one of my most favorite foods in the whole world. I've been making drop biscuits for years, but this morning I finally tried out another biscuit recipe from my sister Maria that uses rolled out dough (rolled with your hands) and biscuit cutters. These two recipes are very similar but this one uses cold butter and the drop biscuits use melted butter. These were so good and easy to make!

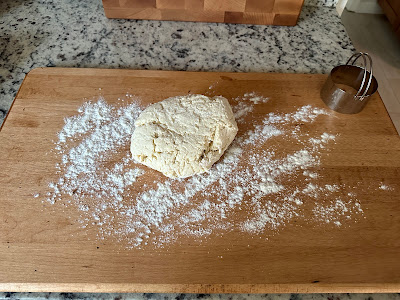
Since I'm not a morning person, I mixed the dry ingredients the night before and set up my pastry board and everything I would need in the morning to make it even easier to get these in the oven quickly. I also cut the frozen butter with a box grater and then froze it in a plastic bag. All I had to do this morning was mix the butter in with the dry ingredients, add the milk, and cut the biscuits with my biscuit cutter. I made scrambled eggs while the biscuits were in the oven and my boys loved making themselves egg biscuits.

These biscuits were so good - the only thing I'll do differently next time is make a double recipe!


Easy Homemade Biscuits

Recipe courtesy “Sugar Spun Run” Blog


2 cups all-purpose flour (250g)

1 Tablespoon baking powder

1 Tablespoon granulated sugar

1 teaspoon salt

6 Tablespoons unsalted butter, very cold (85g), unsalted European butter is ideal, but not required

¾ cup whole milk (177ml) buttermilk or 2% milk will also work


For best results, chill your butter in the freezer for 10-20 minutes before beginning this recipe. It's ideal that the butter is very cold for light, flaky, buttery biscuits.


Preheat oven to 425° and line a cookie sheet with nonstick parchment paper. Set aside.


Combine flour, baking powder, sugar, and salt in a large bowl and mix well. Set aside.


Remove your butter from the refrigerator and either cut it into your flour mixture using a pastry cutter or (preferred) use a box grater to shred the butter into small pieces and then add to the flour mixture and stir.


Cut the butter or combine the grated butter until the mixture resembles coarse crumbs.


Add milk, use a wooden spoon or spatula to stir until combined (don't over-work the dough).


Transfer your biscuit dough to a well-floured surface and use your hands to gently work the dough together. If the dough is too sticky, add flour until it is manageable.


Once the dough is cohesive, fold in half over itself and use your hands to gently flatten layers together. Rotate the dough 90 degrees and fold in half again, repeating this step 5-6 times but taking care to not overwork the dough.


Use your hands (do not use a rolling pin) to flatten the dough to 1" thick and lightly dust a 2¾" round biscuit cutter with flour.


Making close cuts, press the biscuit cutter straight down into the dough (do not twist it) and drop the biscuit onto your prepared baking sheet.


Repeat until you have gotten as many biscuits as possible and place less than ½" apart on baking sheet.


Once you have gotten as many biscuits as possible out of the dough, gently re-work the dough to get out another biscuit or two until you have at least 6 biscuits.


Bake at 425° for 12 minutes or until tops are beginning to just turn lightly golden brown.


If desired, brush with melted salted butter immediately after removing from oven. Serve warm and enjoy.


Yield: 6 biscuits.


Wednesday, October 23, 2024

Easy Italian Sausage Soup Recipe (with Spinach)

I came across another delicious soup recipe that is very easy to make. I changed the recipe a bit by taking out the garlic, onions and red pepper. Since I left those out, I increased the amount of carrots and celery to about 1.5 cups of each. If you like more diced tomatoes, you could use a 28-ounce can of them. I added an entire bag of baby spinach and it would be good with that amount, half the bag, or even without it all together if you don't have any. I also cooked my pasta (I used Rotini) separately and added it into the individual bowls of pasta. That way it doesn't soak up all the broth and get soggy.

Even without the onion and garlic, this soup was full of flavor! Use the link above if you want to see the original recipe. The recipe below reflects the changes I made.


Easy Italian Sausage Soup Recipe (with Spinach)

Recipe Adapted from Cucina by Elena


Easy Italian Sausage Soup Recipe (with Spinach) brings together hearty Italian flavors and nourishing ingredients. It’s a simple, rustic dish perfect for a cozy evening!


1 pound Italian sausage (mild or spicy), casings removed (or 1 pound ground Italian sausage)

4 medium carrots, peeled and diced

4 ribs celery, diced

1 teaspoon Italian seasoning

1½ teaspoons kosher salt

1 teaspoon coarse black pepper

64 ounces low-sodium chicken broth

1 (14.5 oz) can petite diced tomatoes

1½ cups Ditali pasta or another small pasta, dry

1½ cups fresh spinach, chopped

Freshly grated Parmigiano cheese, for serving

Fresh basil, for garnish


Cook the sausage: In a large pot or Dutch oven over medium-high heat, crumble the Italian sausage and cook until browned and no longer pink. Transfer the cooked sausage to a plate and drain any excess fat from the pot, leaving two tablespoons to sauté the vegetables.


Sauté the vegetables: In the same pot, add the carrots and celery. Cook over medium heat until the vegetables are softened, about 8-10 minutes. Stir in Italian seasoning, salt, and black pepper, cooking for another minute.


Simmer the soup: Return the sausage to the pot. Add the chicken broth and diced tomatoes with their juice. Bring the mixture to a boil, then reduce the heat to low and simmer for about 10-15 minutes, allowing the flavors to meld together.


Stir in pasta and cook, stirring often, until pasta is cooked to desired doneness, about 10 minutes. Alternately, cook the pasta separately, drain and serve with the soup.


Stir the chopped spinach into the soup, cooking just until wilted, about 1-2 minutes. 


Garnish and serve: Ladle the soup into bowls and top with freshly grated Parmigiano cheese and a sprinkle of fresh basil. Serve hot. Enjoy.


Serves 6.


Wednesday, October 16, 2024

Italian Wedding Soup

Last year my sister Maria sent me an Italian Wedding Soup recipe she makes for her family. I never got around to making it, but I recently saw an Instagram reel from Dena Fenza and it reminded me I still needed to try it, so I tried Dena's recipe tonight, and it was incredible! Both of the recipes linked above are pretty similar in terms of the ingredients (although the amounts differ slightly), but Dena browns her meatballs on the stove and the other recipe bakes them in the oven.

This soup takes a little more time to prepare than other soups because of having to form the little meatballs, but it is well worth the effort! You can do some of the prep ahead of time - I chopped the veggies and made the meatball mixture in the early afternoon. I used a teaspoon measuring spoon to scoop the meat mixture so they would all be the same size. I counted about 75 mini meatballs! I refrigerated them on a plate until after I picked up my kids from school - that made it easy to start cooking as soon as I got home. I made it in my large wide round dutch oven so there was plenty of room to brown all the meatballs at once. I cooked my Acini Di Pepe separately so it wouldn't get too soft, which worked out well for my picky eater who only wanted broth and pasta.

The recipe below reflects any changes I made to the original. Next time I may leave the onion out (at the request of one of my sons) and try beef broth instead of chicken broth to see which I prefer. I thought the soup was delicious as-is though!


Italian Wedding Soup

Recipe Adapted from Micia Mammas Blog


Italian wedding soup is a kid friendly, easy and delicious soup that everyone will love. The soup is made up of broth, veggies, pasta and the star of the recipe is cute mini meatballs. It is a perfect soup for a cold winter day. 


This Neopolitan soup is originally called “minestra maritata”, which translates to “married soup” It is not served at Italian weddings but its meaning refers to how its flavors come together in a beautiful marriage!


Growing up this soup was a dish that my Grandpa made all the time.  I can still remember helping him roll the mini meatballs. He taught me to sear the meatballs first. It adds such great flavor to the soup. The smell of it just brings me right back to his kitchen. 


Meatballs:

½ pound ground pork

½ pound ground beef

¼ cup panko breadcrumbs

¼ cup grated Pecorino Romano cheese

1 egg, beaten

1 teaspoon salt

1 teaspoon pepper

¾ teaspoon garlic powder

3 Tablespoons chopped fresh parsley or 3 teaspoons dry parsley

¼ cup olive oil


Soup:

1 cup onion, diced

1 cup celery, diced

1 cup carrots, peeled and diced

64 ounces chicken broth

1½ teaspoons salt

1 teaspoon pepper

5 ounces baby spinach

1 pound Acini Di Pepe pasta


In a bowl, combine the pork and beef with the bread crumbs, Pecorino Romano, beaten egg, salt, pepper, garlic powder and chopped fresh parsley. Form into mini meatballs (about 1 teaspoon or less each).


In a soup pot over low/medium heat add ¼ cup of olive oil. Add in the meatballs, working in batches if you have to. Once browned on all sides (about 8 minutes), remove from the pan.  Repeat this process until all the meatballs are cooked and removed from the pan. This oil has great flavor but you will need to remove half of it from the pan or else the soup will be too greasy. Also, try to strain out most of the remaining brown bits from the pan.


Next, add in the onion, carrots and celery and cook on a low flame for about 10 minutes or until they become soft. Season with salt and the black pepper. Stir the mixture and cook for about 2 more minutes. Add the meatballs back in and then add in the broth. Raise the temperature to low/medium and bring to a simmer. Cook for about 30 minutes, making sure the veggies are cooked. Add the spinach and cook a few minutes longer, until the spinach wilts. Taste for seasoning and add salt or pepper if needed.


When there are about 15 minutes of cooking time left, cook your pasta and drain and put in a bowl.  You can add a small amount of olive oil to the pasta so that it does not stick together. I don’t like to cook the pasta in the soup because I find it becomes too soft. Serve the soup with the pasta and top with grated Pecorino Romano cheese.


Serves 7.


Wednesday, October 2, 2024

Nonna's Famous Traditional Italian Meatballs (Polpette)

I love meatballs but I don't make them that often. A few months ago I came across this recipe which I've now made twice. The meatballs cook right in the sauce which means the recipe is very easy - even for a weeknight! I made a few changes to the recipe below to reflect what I did differently, but if you follow the link above you can see the original one. These are so delicious and best of all - my boys love them!