Wednesday, July 24, 2024

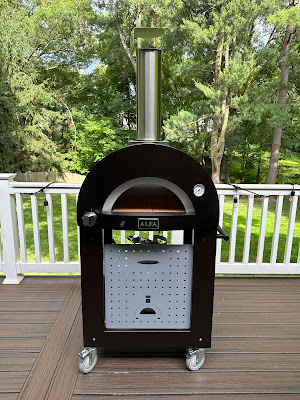
Alfa Forni Moderno 1 Gas Pizza Oven

I recently posted an Ooni Pizza Dough recipe and linked the Ooni pizza oven and accessories that we have. I bought the Ooni as a Christmas gift for my husband about 2.5 years ago. It turns out that my husband likes to use the oven for more than just pizza (wings, steak, fish, etc.) and the size of the oven is a bit limiting since he can't fit his cast iron skillet inside. I recently looked into upgrading to something bigger, perhaps a larger Ooni, but it wasn't quite what I was looking for. I wanted something we could keep outside all the time and use for more than just pizza.

I started looking at Alfa Forni, which are made in Italy. My cousin has an Alfa Brio and loves it, however it's much larger than we need for our small family of 4 and way too expensive for us. Alfa makes various ovens that can hold anywhere from 1 to 5 pizzas at a time - some are wood burning only, some are gas only, and others are hybrid and can use either wood or gas if you purchase the hybrid kit. My husband has used both wood and gas in his Ooni, but gas is much faster and easier and doesn't make a mess.

Alfa makes two small ovens - the smallest is called the Portable and the next size up is called the called the Moderno 1 Pizza (previously called the One and the Nano). These used to come in either gas or wood - there was no option for a hybrid kit with these two smaller ovens, however it looks like a newer version of the Moderno 1 Pizza can now be ordered with a hybrid option. After some research, I decided to go for the Alfa Moderno 1 gas only oven. It makes one 12-14" pizza at a time. Since they only take about 90 seconds to bake, cooking one at a time is fine for us. It is larger than our Ooni, but not so big that it's overkill for us. It's also not so small that it can't crank out 16-20 pizzas when we have larger parties. The oven will easily bake the pizzas faster than we can prepare them. I prefer the smaller size oven so it won't use as much propane and it will heat up quicker than the larger ovens would. The smaller footprint will work better on our deck and not take up as much space. There is also a very big difference in price between this oven and the next size up, the Moderno 2 Pizze, which can hold 2 pizzas at a time. If I could have swung it financially and we had a better outdoor food prep set up, this is the largest oven I would have considered. However, it was both too expensive and too big and heavy for us considering we want to keep it on our deck. The base for this is also a lot more expensive than the base for the Moderno 1. The next size up from that is the Moderno 3 Pizze (this replaced the Brio and can hold 3 pizzas), and then the Moderno 5 Pizze. Alfa also makes professional ovens and other lines of domestic ovens including the ClassicoFuturo, and some Limited Edition, however I only looked at the Moderno ovens.

Some of the Alfa Moderno ovens come in a choice of colors (Antique Red, Fire Yellow, Ardesia Grey), but the Nano gas oven only comes in a dark brown color called Copper. We plan to keep the oven on our Trex deck, which is also a dark brown color, so the oven will look nice there. This oven has a base with casters on it that is available for an additional cost in the same Copper color or in Black.

Once I knew which oven I wanted, I started looking around for the best price. I found two online retailers that were offering the coordinating base/stand for free with the purchase of the oven. This was great since I would have had to purchase a steel table or something else to keep the oven on. The base looks nicer, hides the propane tank, and has very good casters that lock, which will make it easy to move around. They both also offered a 5% discount. While trying to see if I could find a better deal anywhere else, I found a website for a small family-owned business in Oregon called Smokey Mountain Fireplaces and they do not charge sales tax. I reached out to them to ask if they would match the promotion for the free base and 5% discount. They were happy to do so, and even offered to send me some firewood for free. It was really nice to communicate with someone from a small business, and not just an online chat with someone in another country who did not really know much about these ovens. I always prefer to spend my money at a small business, so I was very happy that I came across this one - and because they don't charge sales tax, they had the best price! If you are looking to purchase one of these ovens, I highly recommend contacting them.

I ordered the oven on a Tuesday and it arrived the following Tuesday. It is large and heavy and is delivered like an appliance, on a pallet. The delivery company, Custom Global Logistics, called me from Dulles International Airport to schedule a 4-hour window to deliver it and I was asked by the company I purchased it from to open and inspect everything for damages before the delivery company left, in case I needed to refuse the delivery. Luckily, everything looked great.

The base was very easy to install and looks nice!


There's not much to assembling the oven. All of the pieces that come with it are stored inside the oven, so we just removed those and unwrapped them, and then placed the oven on top of the cart and secured it. We removed all of the protective film. We don't need the 4 feet since we are putting it on a cart, but if you are placing the oven on a table you will need to install those. Lastly, my husband hooked up the propane tank, turned the oven on to preheat it and then prepped dinner! Since this oven is smaller and lighter weight than the others, it was pretty easy for my husband to do most of this by himself. I only helped lift the oven on to the base.


Since all of our deck furniture is Polywood (made out of recycled material, similar to Trex material) and I don't want any of it to melt or get damaged, I bought a folding stainless steel table we can use as a prep table and to keep the pizza peels on and the hot items that come out of the oven. We will have to store this inside so it doesn't rust, but it is small and lightweight enough that carrying it inside and out shouldn't be an issue. We'll put it to the right of the oven that should still leave plenty of space for us to keep all the furniture where we've had it the past few years.


As far as accessories go, we already have most of what we need from using our Ooni. Since the oven will stay outside on our deck year-round and there are trees above our deck that make a mess with leaves and pollen, I wanted a good cover for it. Alfa sells their own covers which cover either just the oven or cover the oven and the base, but neither option covers the smokestack. I also read that they are not the best quality covers and expensive given the lack of quality. My husband wanted a cover that would go over the smokestack so he wouldn't have to attach and remove it every time we use the oven. I read that Coverstore makes good custom covers (they offer a free swatch kit) and their reviews were better than the ones on Covers&All (they offer a free swatch kit as well). Coverstore was having a 40% off Memorial Day weekend sale, but I wanted to wait and measure the oven, smokestack and base (with propane tank connected) myself once we put it all together to make sure I had accurate dimensions for the cover, and they offered to apply the discount for me once I was able to measure it myself and place my order, even though the sale would be over by then. I contacted both companies, and was definitely more impressed with the customer service responses from Coverstore. Because of the 40% off sale price, I decided to order the most expensive material which carries a 10 year warranty. This cover is much better quality and cost less than the Alfa one! I'm also glad I waited to measure everything myself, because the dimensions were slightly different from what the manufacturer provided.

The only other accessory I decided to get was an Alfa 3-piece set with a medium (12") pizza peel, turner and brush. The brush would be helpful for cleaning the pizza stone, and having a second pizza peel would be helpful too. Unfortunately, this set is made in China, not in Italy like the ovens, so I initially hesitated to buy it, but it looked like a much nicer set than the Ooni peels we have and we don't have a brush, and it has adjustable handles for all 3 pieces which is nice. I didn't want to pay full price for this set and could not find any sales on it, but luckily, I found someone selling a brand new, sealed set on Facebook Marketplace and decided to buy it.

We will use our Lodge cast iron 12" skillet and 10.25" skillet in this oven to make all sorts of things. We've had both of these skillets for over 10 years and they are indestructible. I prefer to cook with my Le Creuset enameled cast iron, but I won't be putting those in an outside oven! The Lodge cast iron is perfect for it though and my husband prefers to use those when he cooks. For our first meal in the Alfa, we used the 12" skillet for sausage and peppers and made hot dogs in the 10.25" skillet. It was delicious and cooked pretty fast! We also made wings in the skillet and they were delicious as well!
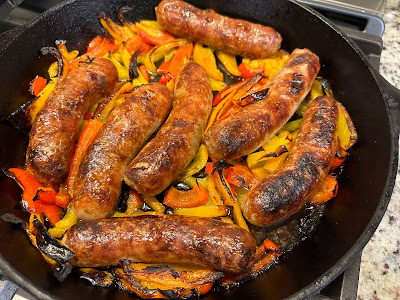
First meal from our pizza oven - sausage and peppers!

and hot dogs for the kids

The first time we used it for pizza was on the 4th of July when I made 4 recipes of the Ooni pizza dough - enough for 16 pizzas. We had 3 of my sisters and their families over for dinner and I unfortunately did not take any pictures once I started putting the pizzas together, but my husband took one photo. The pizzas were delicious and everyone loved them. We only had 1 slice of pizza left!

4 recipes of Ooni pizza dough

Divide each recipe into 4 dough balls after the first rise


After the second ride - ready to use!


The only pizza picture my husband took

This oven is built like a tank (it's made in Italy!), looks nice, and cooks delicious meals. While most people who buy these ovens probably go for the larger sizes, the Moderno 1 is the perfect size for a small family like ours, and it is certainly a major upgrade from any Ooni oven! We are looking forward to using it year-round for many years.

Easy French Dip Sandwiches

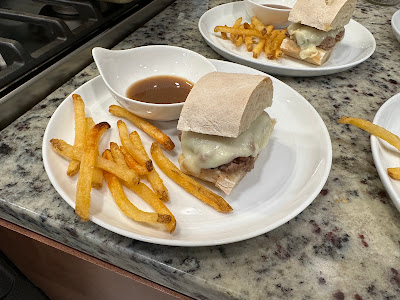
French Dip is one of my favorites that I've ordered from a few restaurants and always loved, but I had never made it myself before. I used my Homemade French Bread to make these French Dip Sandwiches and they were insanely good! I used thinly sliced roast beef from a local deli, which made them super quick and easy to make. My husband loved this as well and could not get enough of it!


Easy French Dip Sandwiches

Recipe from I Heart Naptime


A delicious French dip sandwich made with a toasty baguette, flavorful roast beef, and melted Swiss cheese. So easy to make and done in 10 minutes! 


1 baguette (or your favorite rolls)

1 Tablespoon olive oil

1 shallot (chopped)

1 Tablespoon all-purpose flour

10 ounces beef consommé (use 2 cans if you like a lot of dipping sauce)

1 teaspoon steak seasoning (I prefer McCormick Montreal)

¾ pound lean roast beef (thinly sliced)

4 slices Swiss cheese (thinly sliced)


Preheat the oven to 400°F. Slice the baguette into 4 and then cut horizontally to make the sandwiches. 


In a large skillet over medium heat, add olive oil and heat for 1 minute. Add shallots and sauté for 2 minutes. Add flour and sauté for 1 more minute.


Slowly whisk in beef consommé. Bring to a boil over high heat. Reduce heat to low and simmer. Add steak seasoning and mix until combined.


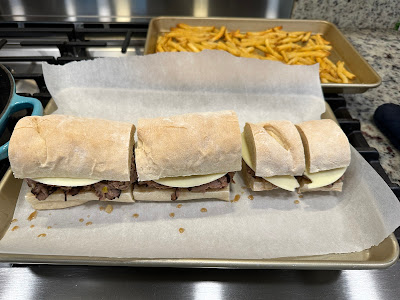
Separate roast beef and place in the au jus sauce until warm. Using tongs, place an equal portion of beef on each section of baguette or rolls. Top with a slice of cheese. Bake for 3-5 minutes, or until the cheese has melted.


Serve with a small bowl of the extra au jus for dipping.


Homemade French Bread

My sister Diana recently sent me this recipe for Homemade French Bread and it was delicious! It's helpful to watch the video to see all the steps before making it, especially how to roll it up. This bread is perfect for sandwich meals - steak and cheese, meatball subs, sausage and peppers, french dip, etc. The recipe makes two and they're big so my family of 4 used them two nights in a row for two dinners. I've made this bread twice so far and both times it was so good!


Monday, July 1, 2024

Marcato Otello Limited Edition Pasta Machine

Recently I was looking for an electric pasta machine that did not need to be clamped to a countertop or table. I ended up finding something very unique and not at all what I was looking for - a manual pasta machine that is a 90th anniversary replica of an original pasta machine from 1930!

The replica is named after Otello Marcato, who created the first manual pasta machine in 1930. This replica is a limited edition collector's item (that is meant to be used!) that came out some time in 2018, in celebration of Marcato's 90th anniversary as a company. Only 2,000 units were produced and they were all numbered on the wooden base. Out of curiosity, I looked all over the internet trying to find a photo of what the original pasta machine from 1930 looked like. This is the only photo I could find - it was on the Facebook page for Costante Imports in Australia and I'm not sure where they got the photo from, but I thought it was so cool! You can learn more about the history of the Marcato company on their website.

Original Marcato Pasta Machine from 1930

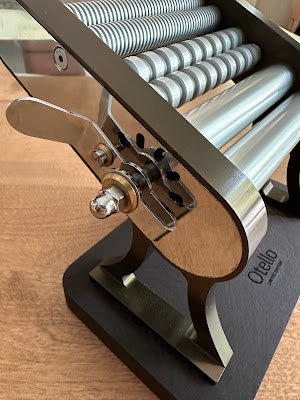
Marcato Otello Limited Edition Pasta Machine from 2018

Marcato Otello Heritage Line Pasta Machine

In addition to not being able to find photos, I could not find much info on this limited edition pasta machine either. I found a few pasta makers on Instagram who have posted photos of it or videos of them using it, and a handful of reviews on websites online, but that's it. I believe this limited batch of 2,000 machines was introduced in the fall of 2018. I have seen it pictured in a few different colors.

Copper Bronze

Gun Metal

Sky Chrome

There was a re-release of it at some point, although I'm not sure when, because the ones still available online today look different than the ones that were sold a few years ago. The shape of the base is different, the color is different, there is no plate with the new ones (and no holes for the plate, so the top looks different), and there is no number on the base on the current version. I had a hard time finding any in stock in the USA. The online retailer in Canada called Consiglio's had 2 left in stock, and also offered a 5% discount, no tax, and free shipping to the USA. This made the price lower than buying directly from the Marcato website, even with their introductory 10% off offer. I also noticed the price dropped $38 a few days after I placed my order, and I contacted their customer service to ask if they would refund me the difference and they did. I ended up paying $342 for it, which is not bad for something made this well, considering the regular price.
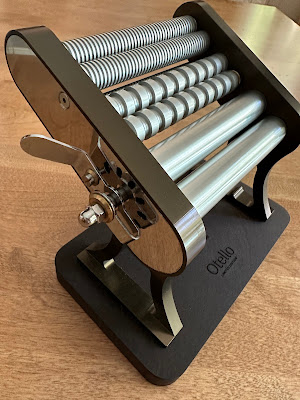
No attachments can be used with this machine (including a motor or other pasta cutters), so you can only use it to roll out pasta/lasagne sheets, cut fettuccine and cut tagliolini. The simplistic nature of it is part of what makes it so great to me. There are a lot of attachments available for the other pasta machines on the market but when I want spaghetti, I usually either want regular spaghetti or wide spaghetti, and if I want something different, I have my 4 KitchenAid attachments with various widths of pasta cutters that I can always use. The attachments on pasta machines also tend to fall off or shake when using, so I like that this is all one stable unit. It is also easy to set up - just take it out of the box, clamp it to the table or countertop and get started! The KitchenAid pasta attachments are fast which is great when making a lot of spaghetti, like my family does at Christmastime when we make 6 batches at a time to feed 50 people at Christmas dinner, however unless you have 2 mixers with one attachment on each, you have to keep changing the roller attachment out with the cutter attachment. With the Otello, you simply have to move the crank, which takes one second to do. The sound of the KitchenAid motor also makes my ears ring after a while. Using the Otello is nice and quiet, which I love! I found a few video tutorials on Marcato's YouTube page that are helpful to watch before using this machine for the first time.

My interest in purchasing this Otello pasta maker is to teach my kids how to make pasta the old school way, hand cranking it out, and then cooking it all for dinner for my family of 4 to enjoy. I don't intend to make more than one batch of pasta at a time using this machine, although it could certainly handle making a large quantity. Making pasta this way can also be very relaxing and soothing! Cooking and eating the spaghetti the same day we make it will also cut down on the time spent to freeze or dry the spaghetti like we have to do when making it in advance for holidays. We all love homemade spaghetti in my house and I'm hoping that making it together will become a more regular thing for our family to do. Yes, it is time-consuming, but that doesn't mean it should only be done once or twice a year in preparation for holidays or special occasions.

Today I used my Otello machine for the first time, using the recipe below, which is based off the recipe I make with my Mom at Christmastime (but I left the salt out of the dough because I heavily salt the boiling water instead). It was quite a bit of fettuccine for 4 people (I froze a little bit but we still had plenty that I cooked tonight left over, so this amount fed us two full dinners), so next time I will only make 4 or 5 eggs worth instead of 7 eggs! My 7 eggs came to exactly 360 grams so they were about 50 grams each, and I did not add any water. Every batch of dough will be slightly different but you should always weigh the flour and eggs for best results, and always use room temperature eggs. 4-5 eggs worth would be 400 grams flour and 240 grams eggs + water (100 grams dry ingredients to 60 grams wet ingredients) - I think I'll try that next time and see if it's the right amount to feed 4 of us. My dough seemed like the perfect consistency, but next time I might try using half semola flour and half 00 flour and see how that comes out, just to compare and see which I like better.

When I was rolling the dough out, I went to setting #5 on this machine, and the fettuccine seemed a little thin to me. This is the setting that Marcato recommends (they recommend setting #5 for fettuccine and setting #6 for tagliolini), but I just prefer it thicker.

Overall, this machine is really nice to use and the fettuccine was delicious! I have made spaghetti many times in my life, but this was the first time I've made an entire recipe using a hand crank machine instead of a motorized pasta machine like my KitchenAid attachments. It took me about an hour and a half to roll out all the sheets of dough and cut them, so it definitely takes more time than with the KitchenAid, but I found it fun and relaxing. The machine is also really nice looking and well-made. It was nice that I didn't have to mess with an attachment falling off or needing re-adjusted like sometimes happens with regular manual pasta machines.

I'm really excited to own this pasta machine. It is so unique looking and functional. I love that it is all one piece and solidly made in Italy. Most importantly, I'm looking forward to using it regularly and passing on my love of making homemade spaghetti to my boys.


Homemade Spaghetti Dough


600 grams flour (Anna "00" Flour)

360 grams organic brown eggs, room temperature

(about 6 or 7 eggs) + water (maybe 1/8 cup of water or so but not more than that, to add to the eggs to get to 360 grams)


Add all ingredients to a KitchenAid mixer bowl and mix until the dough comes together.


Knead the dough and shape into a ball, then cover with plastic wrap for at least 30 minutes.


Once ready, cut dough into small sections to roll out. Keep the rest of the dough covered so it does not dry out.


Roll dough using a pasta machine, several times on setting 1 (folding and flouring the dough between each pass through the machine), and then once each on settings 2-4, then twice on setting 5.


Cut the long sheet of pasta to your desired length (12" or so), flour it, then run it through your pasta cutter of choice (spaghetti, trenette, fettuccine, linguine, etc.).


Dry the spaghetti on a rack, separating the pieces so they don't stick together, or make into lightly floured "nests" and flash freeze on a cookie sheet, then store in a container in the freezer.


Drop the dry spaghetti or frozen nests directly into salted boiling water (do not defrost the frozen nests first). Homemade spaghetti cooks in just a few minutes.


Note: To make a smaller or larger batch of dough, use 100 grams dry ingredients to 60 grams wet ingredients.